Showing posts with label Ubuntu. Show all posts

Friday, September 23, 2016

Ubuntu 16.04 iso 的镜像连接


今天。想玩玩 Ubuntu,所以想制作一个 U 盘安装Linux 系统,但是,在官网下载的都是 amd的iso.所以无法制作U盘驱动,下面的是你想要的东西,下载 i386.iso 后缀的镜像就可以使用了。好东西要分享给大家!


https://mirror.umd.edu/ubuntu-iso/16.04/

Monday, June 13, 2016

Ubuntu how to install minidwep ?


Minidwep gtk on Ubuntu


3 Step to install minidwep gtk on ubuntu, tested with ubuntu 14.04 lts.

Step 1 (Dependencies)

open terminal and write the below codes one by one.

  •  sudo apt-get install libssl0.9.8
  • sudo apt-get install build-essential libssl-dev iw
  • sudo apt-get install libpcap-dev sqlite3 libsqlite3-dev libpcap0.8-dev
  • sudo apt-get install aircrack-ng
  • sudo apt-get install gksu
  • sudo apt-get install reaver
  • sudo airodump-ng-oui-update 

Step 2 (Install Minidwep)

Download minidwep-gtk-40420-ubuntu-32bit.deb from HERE.

Copy and paste it on your desktop.

write these codes:

  • cd Desktop      (push Enter)
  • sudo dpkg -i '#/minidwep-gtk-40420-ubuntu-32bit.deb'  (Push Enter)
note: replace # with your location 

(Right click and click properties of the deb file)
For me, the code will be like this. sudo dpkg -i '/home/darkhean/Desktop/minidwep-gtk-40420-ubuntu-32bit.deb'


 Step 3 (Launch)

  write this code
  •  sudo minidwep-gtk

 
Every time you want to open minidwep-gtk, just open terminal and write sudo minidwep-gtk

That's all. TQ.


THanks To:

http://free-internet-streamyx.blogspot.com/2014/09/minidwep-gtk-on-ubuntu.html

Friday, May 13, 2016

Ubuntu how to config JAVA_HOME

1.  Ubuntu how to config JAVA_HOME

To set JAVA_HOME environment variable, do the following:

Launch Terminal by pressing Ctrl+Alt+T on your keyboard.
Enter the following command:
$ gksudo gedit /etc/environment
Depending on where you installed your Java, you will need to provide the full path. For this example, I installed Oracle JDK 7 in the /usr/lib/jvm/java-7-oracle directory.
Scroll to the end of the file and enter the following:
JAVA_HOME=/usr/lib/jvm/java-7-oracle
export JAVA_HOME
Save your file and exit gedit.
Lastly, reload the system PATH with the following command:
$ . /etc/environment

http://askubuntu.com/questions/175514/how-to-set-java-home-for-java

Monday, April 25, 2016

How to push local git to server?


I have not find good way to resolve this quesiton!

You can following this way:
FIrst :

You must set up git repo in the server:
git init --bare demo.git

In your client PC or Computer
Second: you just use clone command to clone the code:
git clone ssh:ip/directiry/demo.git

So EASY

Now you just start your work or you copy your had write code to the program! Just so easy!

Now you have done~


I try this way:
http://stackoverflow.com/questions/8978650/how-do-i-move-my-local-git-repository-to-a-remote-git-repository

can not resolve this question


Monday, April 11, 2016

Ubuntu how add gradle to PATH

Step-by-step instructions
Gradle is a Java build system. It uses a clean, simple configuration syntax and is used by Android as the default build system. For API development, Gradle is supported by Spring.
Installation is quick and simple. We are going to install a private copy so that root permissions are not required during development.

Download Gradle

mkdir -p ~/opt/packages/gradle && cd $_

wget https://services.gradle.org/distributions/gradle-2.3-bin.zip

unzip gradle-2.3-bin.zip

Install and setup Gradle

Next, we will create a symlink that provides a shorter path to the specific Gradle version. The symlink will allow us to upgrade Gradle later without changing any other configuration.
ln -s ~/opt/packages/gradle/gradle-2.3/ ~/opt/gradle
Open your .profile file in vi, emacs, or gedit.
gedit ~/.profile
Paste the following at the bottom of your .profile file.
# Gradle
if [ -d "$HOME/opt/gradle" ]; then
    export GRADLE_HOME="$HOME/opt/gradle"
    PATH="$PATH:$GRADLE_HOME/bin"
fi
Finally, source your .profile and test gradle.
source ~/.profile

which gradle

gradle -version
Congratulations, you now have a working Gradle installation.


THanks to:
http://exponential.io/blog/2015/03/30/install-gradle-on-ubuntu-linux/

ubuntu how to install gradle

sudo add-apt-repository ppa:cwchien/gradle
sudo apt-get update
sudo apt-get install gradle

Sunday, April 10, 2016

Ubuntu VIm I can't input anything?

Because you have not install vim!


So you just install vim ,It will resolve your question

First:

open terminal

sudo apt-get install vim

OK  It works for me!

Now you can use vim!

Tuesday, February 23, 2016

只用root 用户验证了ssh key,可以不用输入密码登录, 普通用户只能通过密码登录

这两天 一直在研究, 为什么自己的Git 登录的时候老是需要输入密码,但是我已经设置了SSH keygen 给VPS 的普通的用户了,还是需要我输入信息,这让我很恼火的!

这两天一直在研究为什么?

找到了原因在这篇博客:

因为 etc/ssh/sshd_config

中有一个参数:
PermitRootLogin yes

所以,只有root用户才有权限使用ssh,其他的用户就算是 添加了ssh  id_rsa.pub key 也是没有用的!依然需要输入密码!


最终解决方案:

将你的 密码设置的短一点!
  哈哈哈


Saturday, January 23, 2016

Ubuntu Please install the openssl library (with development headers)

when i use make menuconfig

show error info:
Ubuntu Please install the openssl library (with development headers)

in the terminal:

Ubuntu 

sudo apt-get install libssl-dev

it works for me!

Ubuntu please install a static zlib. (missing libz.a or zlib.h)


in the terminal:

apt-get install zlib1g-dev

如何安装Buntu?

安装Ubuntu 的教程,有很多,但是有的时候你按照教程一步一步的做了,但是还是不成功,你知道为什么吗?


原因:

我们应该插上网线,再去安装!

Wednesday, December 16, 2015

Sunday, December 13, 2015

Ubuntu 15.10 无法联网

在安装 Ubuntu 的时候,对于菜鸟而言,都会遇到安装上之后,无法连接网络!

WHy?

是因为,缺少网卡驱动的原因。我也是醉了!

因为,我之前也遇到这种问题,一直在搁浅,没有找到解决方案,前两天想装一个Ubunt 15.10  玩玩,结果死活就是无法联网。

原来我们都犯了同样的错误: 就在装系统的时候,我们没有插网线! 导致了,你安装的Ubuntu 没有网卡驱动。而你,又不知道该如何下载和安装驱动!

Saturday, July 18, 2015

How To Install Linux, Apache, MySQL, PHP (LAMP) stack on Ubuntu

参考网址


About LAMP

LAMP stack is a group of open source software used to get web servers up and running. The acronym stands for Linux, Apache, MySQL, and PHP. Since the virtual private server is already running Ubuntu, the linux part is taken care of. Here is how to install the rest.

Set Up

The steps in this tutorial require the user to have root privileges on your VPS. You can see how to set that up in the Initial Server Setup in steps 3 and 4.

Step One—Install Apache

Apache is a free open source software which runs over 50% of the world’s web servers.
To install apache, open terminal and type in these commands:
sudo apt-get update
sudo apt-get install apache2
That’s it. To check if Apache is installed, direct your browser to your server’s IP address (eg. http://12.34.56.789). The page should display the words “It works!" like this.

How to Find your Server’s IP address

You can run the following command to reveal your server’s IP address.
ifconfig eth0 | grep inet | awk '{ print $2 }'

Step Two—Install MySQL

MySQL is a powerful database management system used for organizing and retrieving data
To install MySQL, open terminal and type in these commands:
sudo apt-get install mysql-server libapache2-mod-auth-mysql php5-mysql
During the installation, MySQL will ask you to set a root password. If you miss the chance to set the password while the program is installing, it is very easy to set the password later from within the MySQL shell.
Once you have installed MySQL, we should activate it with this command:
sudo mysql_install_db
Finish up by running the MySQL set up script:
sudo /usr/bin/mysql_secure_installation
The prompt will ask you for your current root password.
Type it in.
Enter current password for root (enter for none): 

OK, successfully used password, moving on...
Then the prompt will ask you if you want to change the root password. Go ahead and choose N and move on to the next steps.
It’s easiest just to say Yes to all the options. At the end, MySQL will reload and implement the new changes.
By default, a MySQL installation has an anonymous user, allowing anyone
to log into MySQL without having to have a user account created for
them.  This is intended only for testing, and to make the installation
go a bit smoother.  You should remove them before moving into a
production environment.

Remove anonymous users? [Y/n] y                                            
 ... Success!

Normally, root should only be allowed to connect from 'localhost'.  This
ensures that someone cannot guess at the root password from the network.

Disallow root login remotely? [Y/n] y
... Success!

By default, MySQL comes with a database named 'test' that anyone can
access.  This is also intended only for testing, and should be removed
before moving into a production environment.

Remove test database and access to it? [Y/n] y
 - Dropping test database...
 ... Success!
 - Removing privileges on test database...
 ... Success!

Reloading the privilege tables will ensure that all changes made so far
will take effect immediately.

Reload privilege tables now? [Y/n] y
 ... Success!

Cleaning up...
Once you're done with that you can finish up by installing PHP.

Step Three—Install PHP

PHP is an open source web scripting language that is widely use to build dynamic webpages.
To install PHP, open terminal and type in this command.
sudo apt-get install php5 libapache2-mod-php5 php5-mcrypt
After you answer yes to the prompt twice, PHP will install itself.
It may also be useful to add php to the directory index, to serve the relevant php index files:
sudo nano /etc/apache2/mods-enabled/dir.conf
Add index.php to the beginning of index files. The page should now look like this:
<IfModule mod_dir.c>

          DirectoryIndex index.php index.html index.cgi index.pl index.php index.xhtml index.htm

</IfModule>

PHP Modules

PHP also has a variety of useful libraries and modules that you can add onto your virtual server. You can see the libraries that are available.
apt-cache search php5-
Terminal will then display the list of possible modules. The beginning looks like this:
php5-cgi - server-side, HTML-embedded scripting language (CGI binary)
php5-cli - command-line interpreter for the php5 scripting language
php5-common - Common files for packages built from the php5 source
php5-curl - CURL module for php5
php5-dbg - Debug symbols for PHP5
php5-dev - Files for PHP5 module development
php5-gd - GD module for php5
php5-gmp - GMP module for php5
php5-ldap - LDAP module for php5
php5-mysql - MySQL module for php5
php5-odbc - ODBC module for php5
php5-pgsql - PostgreSQL module for php5
php5-pspell - pspell module for php5
php5-recode - recode module for php5
php5-snmp - SNMP module for php5
php5-sqlite - SQLite module for php5
php5-tidy - tidy module for php5
php5-xmlrpc - XML-RPC module for php5
php5-xsl - XSL module for php5
php5-adodb - Extension optimising the ADOdb database abstraction library
php5-auth-pam - A PHP5 extension for PAM authentication
[...]
Once you decide to install the module, type:
sudo apt-get install name of the module
You can install multiple libraries at once by separating the name of each module with a space.
Congratulations! You now have LAMP stack on your droplet!

Step Four—RESULTS: See PHP on your Server

Although LAMP is installed, we can still take a look and see the components online by creating a quick php info page
To set this up, first create a new file:
sudo nano /var/www/info.php
Add in the following line:
<?php
phpinfo();
?>
Then Save and Exit.
Restart apache so that all of the changes take effect:
sudo service apache2 restart
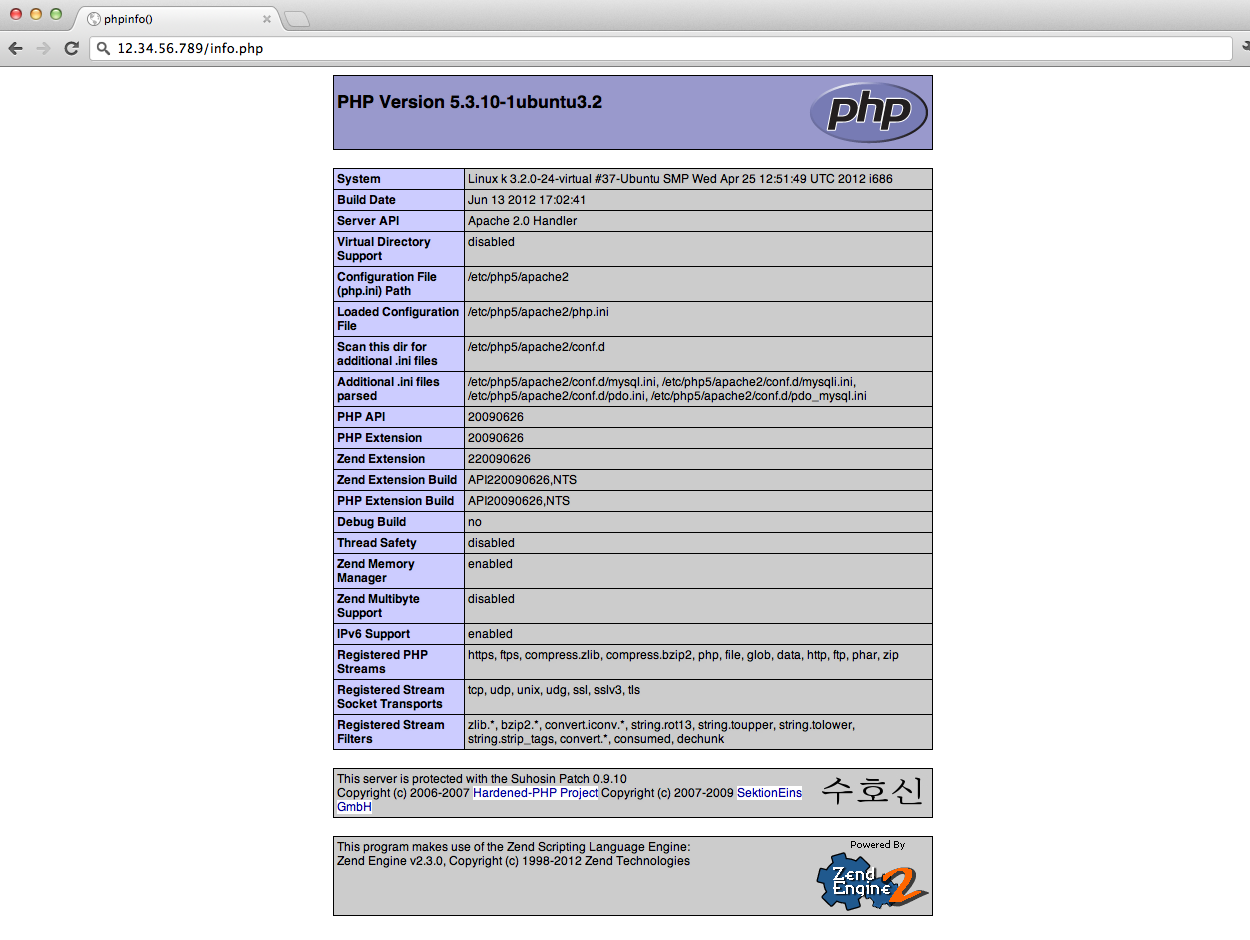
Finish up by visiting your php info page (make sure you replace the example ip address with your correct one): http://12.34.56.789/info.php
It should look similar to this.

See More

After installing LAMP, you can Set Up phpMyAdminInstall WordPress, go on to do more with MySQL (A Basic MySQL Tutorial), Create an SSL Certificate, or Install an FTP Server.
By Etel Sverdlov

Friday, July 10, 2015

Android studio first open app so slow?

问题:


解决方法
是首先关闭安装向导,如果无法关闭可以在任务管理器中手工关掉进程,然后打开Android Studio安装目录的bin目录下面的idea.properties文件,添加一条禁用开始运行向导的配置项:

disable.android.first.run=true
然后再启动程序,就OK了!


之后就是配置SDk !

Android studio 无法创建ANdroid project 项目?在Ubuntu 14.10 的环境下   

这两天有一个问题让我头疼挺:

问题:
在Ubuntu 14.10 的环境下   Android studio 无法创建ANdroid project 项目?

问题描述:
再打开Android studio 的时候,无法创建Android 项目,因为根本就没有那个选项。所以,我很蛋疼。找了好几天才知道原因!

解决方案:
原来是我的JDK SDK 的路径的问题。 
问题就出在Android is so 聪明。 她帮我们做了很多的事情。所以, 我根本就不知道我在 ubuntu 环境下面还需要配置 PATH路径。但是Linux的权限有事各种问题。导致了SDK无法访问。 在配置里面的SDK的路径都是访问不到的,仔细观察会有灰色的小叹号!

如图:


重新配置SDK  JDK    重启电脑就OK了!


----------------

Ubuntu:
配置PATH:
export   ANDROID_HOME=“android sdk path”


上图为证:


Sunday, June 21, 2015

How to set wifi in ubuntu 14.10 Thinkpad E431

参考网址:https://help.ubuntu.com/community/WifiDocs/Driver/bcm43xx?action=show&redirect=BroadcomSTA%28Wireless%29


command:


Open a Terminal and install the bcmwl-kernel-source package:
sudo apt-get update
sudo apt-get --reinstall install bcmwl-kernel-source

Note: If you see the message "Module build for the currently running kernel was skipped since the kernel source for this kernel does not seem to be installed" then you are missing the appropriate generic linux-header package(s).

Saturday, June 20, 2015

Tuesday, June 16, 2015

Ubuntu 如何设置类似QQ截图的快捷键?

平时使用电脑,总会遇到一些有趣或者有意义的东西,我们想截下图来与朋友分享或者自己保留纪念。
在windows 平台上,你想截个图,有好几种选择,你可以使用windows系统自带的截图工具,360浏览器的截图功能,或者QQ截图,还有键盘上的prt sc 截图键。
但是在linux系统上怎么截图呢?键盘上的截图键还可以用,不过那是截取一整个屏幕的,想要截图某一个区域的时候怎么办呢?
在ubuntu 10.04 的时候,还可以很方便地在applications 那里找到screenshot 截图工具,可是自从ubuntu 10.10 以后,我开始老是找不到ubuntu 的截图工具。
后来,才发现,在dash 中输入screenshot 就可以找到了。
此外,还可以使用命令来截图,ubuntu 中截图命令是gnome-screenshot .
可以在终端输入gnome-screenshot -h 来查看该命令的用法
用法:
gnome-screenshot [选项...] 抓取屏幕的图片
帮助选项:
-h, –help 显示帮助选项
–help-all 显示全部帮助选项
–help-gtk 显示 GTK+ 选项
应用程序选项:
-w, –window 抓取窗口,而不是整个屏幕
-a, –area 抓取屏幕的一个区域,而不是整个屏幕
-b, –include-border 抓图中包含窗口边框
-B, –remove-border 去除屏幕截图的窗口边框
-d, –delay=秒 在指定延迟后抓图[以秒计]
-e, –border-effect=效果 添加到边框的特效(阴影、边框或无特效)
-i, –interactive 交互式设定选项
–display=显示 要使用的 X 显示
我们常用到的截图选项是截取某个区域的,因此不妨给它设置一个快捷键。ubuntu 12.10 中怎么设置快捷键呢?
假设,我想要按下Ctrl+Alt +A 来实现区域截图
依次打开【system settings】(系统设置)–》【keyboard】(键盘)–》【shortcuts】(快捷键)–》【custom shortcuts】(自定义快捷键),点击那个加号“+”,在【name】输入 screenshot , 【command】输入 gnome-screenshot -a ,点击【apply】确定后,再点击disable ,接着就同时按下 Ctrl+Alt +A 就可以成功设置截图快捷键了。